Getting Started
The Aegis client is an Electron-based desktop application designed to streamline your simulation management and interaction. Whether you're running simulations, managing agents, or modifying world maps, the Aegis client provides all the tools you need in one place.
This guide will help you understand its features and functionality, ensuring you get the most out of the Aegis simulation platform.
Initial Setup
Before using the client, ensure you have set up the Aegis path by clicking the "Setup Aegis Path" button and selecting the Aegis root directory.
Client Tabs Overview
The Aegis client has several tabs, each serving a specific purpose. Here's a breakdown:
Aegis Tab
Once you select a world and specify the rounds, use this tab to launch Aegis.
Agents Tab
In this tab, you’ll manage your agents. For Assignment 1, you’ll connect a single agent. This is where you specify which agent you want to run.
Game Tab
This tab provides a real-time view of your simulation statistics.
Editor Tab
Here, you can create and customize world maps. Think of this tab as your creative space, where you design the worlds your agents will explore.
Settings Tab
If you ever need to reconfigure the Aegis code path or toggle move cost, this is the tab to visit.
World Editor Brushes
When editing the world map, you'll use various brushes to place objects and configure cell types. Each brush has its own purpose:
Special Cells Brush
This brush adds special map elements like spawns, fire, killer, and charging cells.
Move Cost Brush
This brush adjusts the move cost for each cell, with values from 2-5 or custom options, and color visualization for easier editing.
Stack Content Brush
The Stack Content Brush lets you add objects to the cell stacks. For assignment 1, you’ll only need to place one survivor on the world map.
View Brush
With the View Brush, you can inspect cell details and properties in a read-only mode. It’s perfect for analyzing the world without making any modifications.
Editing Tips
Editing maps can be tricky, but these tips will help streamline the process:
- Left-click to place objects.
- Right-click to delete them.
- Make sure to select the correct brush type before placing or deleting specific objects.
Client UI Components
The client’s UI is designed for clarity and ease of use. Below is a breakdown of the essential components:
World Objects
In the world view, you’ll see survivors, groups, rubble*, and special cells. These elements are represented visually to help you identify key features in the world.
- Survivor (light blue)
- Survivor Group (dark blue)
- Rubble
- Charging Cell
- Killer Cell
- Fire Cell
- Spawn Cell
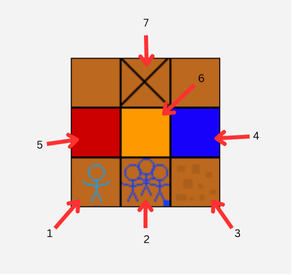
Visual guide to the world objects in the Aegis client.
Note: The UI may look different if it is updated in future releases.
Timeline
The Timeline lets you control and navigate the simulation playback. Here’s how to interact with it:
- Jump Between Rounds: Click on the timeline to navigate directly to a specific round.
- Previous/Next Buttons: Move backward or forward by one round at a time.
- Play/Pause: Control simulation playback to pause or resume the action.
- Minimize Button: Hide the timeline to give more space to the world view.
- Keyboard Shortcuts:
- left/right arrow to move between rounds.
- Press Space to play/pause.
- Press M to minimize/maximize the timeline.
Info Panels
The client has several Info Panels that provide detailed data on specific components:
- Cell Panel: Displays the cell type, move cost, agents present, and other relevant information for each cell.
- Agent Panel: Shows detailed agent information, including location, energy, latest command, and current layer details.